Nothing induces panic quite like attempting to load your website and being met with a stark, plain white screen displaying the words: “403 Forbidden – You don’t have permission to access this resource.” Unlike a 404 error (which means a file is missing) or a 500 error (which means the server crashed), a 403 Forbidden error indicates that your server is perfectly healthy, the file exists, but the server is actively rejecting your request to view it. You are essentially bouncing off a security checkpoint.
In 90% of cases within an Apache shared hosting environment, this security blockade is caused by one of two things: a misconfigured .htaccess file or incorrect file permissions. When you install a new security plugin, migrate your website, or attempt to harden your server, these configurations can easily become tangled, locking out everyone—including you as the administrator.
This diagnostic guide will walk you through the systematic process of identifying the roadblock, isolating the .htaccess rules, restoring proper UNIX file permissions, and regaining full access to your web property.
Step 1: Isolating and Resetting the .htaccess File
The .htaccess (Hypertext Access) file is a powerful server configuration file used by Apache web servers. It controls directory-level configuration, URL redirects, SSL enforcement, and access restrictions. Because it is so powerful, a single missing bracket or typo in this file will instantly trigger a 403 or 500 error.
Many WordPress security plugins (like Wordfence or iThemes Security) aggressively write rules to this file to block malicious IP addresses and bots. If a rule is written incorrectly, it can block all incoming traffic. The fastest way to determine if the .htaccess file is the culprit is to temporarily neutralize it.
Enabling Hidden Files in cPanel
Because the file name starts with a dot (.), it is classified as a hidden system file in Linux. By default, the cPanel File Manager will not show it to you.
- Log into your cPanel dashboard and open the File Manager.
- Look at the top right corner of the screen and click the Settings button (gear icon).
- A preferences window will pop up. Check the box that says Show Hidden Files (dotfiles).
- Click Save.
Neutralizing the File
- Navigate to your website’s root directory, which is usually
public_html. - Locate the
.htaccessfile. - Right-click the file and select Rename.
- Change the name to
.htaccess_backupor.htaccess_oldand save the change.
By renaming the file, the Apache server can no longer find it, which means it will bypass all custom rules and redirects.
Open a new incognito browser window and attempt to load your website.
- If the site loads: You have successfully identified the problem. The
.htaccessfile was corrupted. - If the site still shows 403 Forbidden: The
.htaccessis not the primary issue. Rename the file back to.htaccessand move directly to Step 2.
Generating a Fresh WordPress .htaccess
If renaming the file fixed the site, your internal pages (like [yourwebsite.com/about](https://yourwebsite.com/about)) are likely now showing 404 errors because WordPress relies on .htaccess to format its permalinks. You need to generate a fresh, clean configuration.
- Log into your WordPress admin dashboard (e.g.,
[yourdomain.com/wp-admin](https://yourdomain.com/wp-admin)). - In the left sidebar, navigate to Settings > Permalinks.
- You do not need to change any settings here. Simply scroll to the bottom of the page and click the Save Changes button.
By clicking that button, WordPress will automatically generate a brand new, perfectly formatted .htaccess file in your public_html directory with the default routing rules:
# BEGIN WordPress
<IfModule mod_rewrite.c>
RewriteEngine On
RewriteRule .* - [E=HTTP_AUTHORIZATION:%{HTTP:Authorization}]
RewriteBase /
RewriteRule ^index\.php$ - [L]
RewriteCond %{REQUEST_FILENAME} !-f
RewriteCond %{REQUEST_FILENAME} !-d
RewriteRule . /index.php [L]
</IfModule>
# END WordPress
Step 2: Auditing and Correcting UNIX File Permissions
If your .htaccess was not the problem, the next most common cause of a 403 error is incorrect file and directory permissions.
Linux servers use a three-digit numerical system to determine who is allowed to Read (4), Write (2), and Execute (1) a file. These permissions are assigned to three groups: the Owner, the Group, and the Public (World).
- If a folder’s permissions are set too strictly (like
000), the web server is not allowed to read the files inside, resulting in a 403. - If permissions are too loose (like
777), your hosting provider’s security daemon will automatically block execution to prevent malware from hijacking the server, also resulting in a 403.
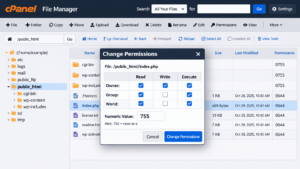
- All Directories (Folders): Must be set to
755(Owner can read/write/execute; Group and Public can read/execute). - All Files (PHP, HTML, Images): Must be set to
644(Owner can read/write; Group and Public can only read).
Fixing Permissions via File Manager
- In the cPanel File Manager, navigate to
public_html. - Look at the far right column labeled Permissions.
- Verify the permissions of your main folders (
wp-admin,wp-content,wp-includes). They should all read0755. If they say0777or0644, right-click the folder, select Change Permissions, check the appropriate boxes to equal755, and save. - Verify the permissions of your core files (
wp-config.php,index.php). They should read0644. (Note: Some highly secure hosts requirewp-config.phpto be set to0400or0440. If0644doesn’t work for that specific file, try0440).
If you have SSH (Terminal) access to your server, you can fix all permissions instantly by running these two commands from your root directory:
find . -type d -exec chmod 755 {} \;
find . -type f -exec chmod 644 {} \;
Step 3: Checking for the Missing Index File
Apache servers are configured to load a specific default file when a user navigates to a directory. In WordPress, this is always index.php. On static HTML sites, it is index.html.
If a user navigates to techtrailhub.com, the server automatically looks for [techtrailhub.com/index.php](https://techtrailhub.com/index.php). If that index file is missing, the server will attempt to display a raw list of all the files in that directory. However, to prevent data leaks, most modern hosting providers disable “Directory Browsing” by default.
Therefore, if index.php is missing, and Directory Browsing is disabled, the server has nothing to show the user and will throw a 403 Forbidden error.
- Open your cPanel File Manager and go to
public_html. - Look for
index.php. - If it is missing (perhaps deleted by accident or quarantined by an antivirus scanner), you need to replace it.
- Download a fresh copy of WordPress from
wordpress.org, extract the.zipfile on your computer, locate theindex.phpfile, and upload it directly into yourpublic_htmlfolder.
Step 4: Disabling ModSecurity (Web Application Firewall)
If you have completely reset your .htaccess, verified all file permissions, and ensured your index files are present, the 403 error is being generated at the server firewall level.
Most cPanel environments use ModSecurity, an open-source Web Application Firewall (WAF). ModSecurity inspects every incoming web request. If it detects a request that looks like an SQL injection, cross-site scripting (XSS), or a known botnet signature, it will intercept the request and drop a 403 Forbidden error on the user.
Occasionally, ModSecurity yields “false positives,” blocking legitimate actions like saving a long WordPress post, updating a complex theme, or running a specific plugin.
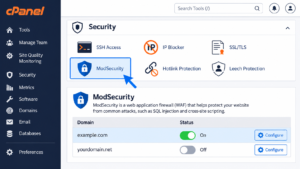
To test if the firewall is the issue:
- Go to your main cPanel dashboard.
- Scroll down to the Security section and click on ModSecurity.
- You will see a list of your domains. Toggle the status button to Off for your specific domain.
- Go back to your website and replicate the action that caused the 403 error.
If the error vanishes, ModSecurity was blocking you. Do not leave ModSecurity off permanently. Disabling it leaves your site highly vulnerable to automated attacks. Instead, contact your web hosting support team, tell them that ModSecurity is throwing a false positive 403 error on your site, and ask them to whitelist the specific ModSec rule ID that is being triggered. They can find the exact rule ID in the server’s Apache error logs.
Frequently Asked Questions
1. Can a CDN like Cloudflare cause a 403 Forbidden error?
Yes. If Cloudflare’s Web Application Firewall (WAF) or Bot Fight Mode identifies your IP address or browser footprint as malicious, Cloudflare will serve a 403 error before the request even reaches your cPanel server. You can verify this by checking the Cloudflare Firewall Events log in your Cloudflare dashboard.
2. I only get a 403 error when trying to access my wp-admin page. Why?
This is almost always caused by a security plugin (like Limit Login Attempts or Wordfence) that has blacklisted your specific IP address after too many failed password attempts. You can bypass this by logging into cPanel File Manager, navigating to wp-content/plugins, and renaming the security plugin’s folder to deactivate it.
3. Why does my 403 error page look like a generic white screen instead of my theme?
Because the server is denying access at the foundational level, WordPress is not allowed to load its theme, CSS, or error templates. The server falls back to a raw, unstyled Apache HTTP error document.
Sources and References
- Apache HTTP Server Documentation: Authentication and Authorization (HTTP 403).
- WordPress Developer Codex: Changing File Permissions.
- cPanel Knowledge Base: How to manage ModSecurity.