
Running a website on shared web hosting is the most cost-effective way to get online. However, shared environments come with strict resource limits (CPU, RAM, and entry processes). When your website experiences a traffic spike or a brute-force bot attack, it can easily hit these limits, resulting in slow load times or the dreaded “508 Resource Limit Is Reached” error.
This is where a Content Delivery Network (CDN) and web security proxy like Cloudflare becomes indispensable. Cloudflare acts as an intermediary layer between your website visitors and your shared hosting server. By caching your static content (images, CSS, JavaScript) on its global network of edge servers, Cloudflare serves data to visitors from the data center closest to them. This drastically reduces the physical distance data must travel, improving your Time to First Byte (TTFB) and significantly reducing the bandwidth and CPU load on your origin shared server.
Setting up Cloudflare does not require advanced coding skills or moving your website files. It simply requires a DNS (Domain Name System) change. This comprehensive, step-by-step guide will walk you through integrating Cloudflare with your shared hosting account safely, ensuring your website gets faster and more secure without breaking your email or SSL certificates.
Prerequisite: Gather Your Credentials
Before initiating the setup, ensure you have access to two specific dashboards:
- Your Domain Registrar: The company where you purchased your domain name (e.g., Namecheap, GoDaddy, Domain.com). You will need this to change your nameservers.
- Your Web Hosting Control Panel: Typically cPanel. You will need this to verify your server’s IP address and ensure your email records are correctly mapped.
Step 1: Create a Cloudflare Account and Add Your Site
The first step is establishing your Cloudflare environment. Cloudflare offers a highly generous free tier that includes global CDN caching, unmetered DDoS protection, and a free Universal SSL certificate, which is more than sufficient for most blogs, portfolios, and small business sites.
- Navigate to the official Cloudflare website and sign up for a free account.
- Once logged in, click the prominent Add a Site button located at the top of the dashboard.
- Enter your root domain name (e.g.,
techtrailhub.com). Do not includewwworhttps://in this field. Click Add Site. - Cloudflare will present you with its pricing tiers. Scroll to the bottom, select the Free plan, and click Continue.
Cloudflare will now initiate an automated scan of your domain’s existing DNS records. It queries public DNS registries to pull in your A records, CNAMEs, MX (Mail Exchange) records, and TXT records so that the transition is seamless.
Step 2: Review and Configure Your DNS Records
This is the most critical step in the setup process. Incorrectly configuring these records is the primary reason beginners break their website or email functionality when activating Cloudflare.
When the DNS scan completes, you will see a list of your records. Next to most records, you will see a cloud icon. This icon dictates how Cloudflare handles the traffic for that specific subdomain or record.
- Orange Cloud (Proxied): Traffic is routed through Cloudflare’s servers. Your origin IP is hidden, and the traffic benefits from caching and firewall protection.
- Gray Cloud (DNS Only): Traffic goes directly to your shared server, bypassing Cloudflare entirely.
To ensure your shared hosting environment operates perfectly, configure the proxies as follows:
- Your Main Domain & WWW: Locate the
Arecord for your root domain (techtrailhub.com) and theCNAMEforwww. Ensure both of these have the Orange Cloud enabled. This ensures your website traffic is accelerated and protected. - Email Records (Crucial): Cloudflare does not proxy standard SMTP/IMAP/POP3 email traffic on its free plan. If you route email through Cloudflare, your webmail will break. Locate any
Arecords namedmail,webmail,cpanel, orautodiscover. Click the orange cloud icon to toggle it to a Gray Cloud (DNS Only). - MX Records: Your MX (Mail Exchange) record should point to your
mail.yourdomain.comrecord. Cloudflare automatically sets MX records to DNS Only, but verify this is the case. - Once you have verified the main domain is proxied and the server management/email subdomains are bypassed, click Continue.
Step 3: Update Your Nameservers at the Registrar
For Cloudflare to manage your traffic, you must point your domain to their network. Cloudflare will provide you with two new custom nameservers (e.g., amy.ns.cloudflare.com and jeff.ns.cloudflare.com).
- Log into the account where you registered your domain (your domain registrar).
- Navigate to your domain management or DNS settings area.
- Look for a section labeled Nameservers or Custom DNS.
- Remove the existing nameservers (which currently point to your shared hosting provider).
- Input the two specific nameservers Cloudflare provided. Ensure there are no typos or trailing spaces.
- Save the changes.
Return to your Cloudflare dashboard and click the Done, check nameservers button.
Note on Propagation: DNS changes are not instant. It can take anywhere from 15 minutes to 24 hours for the new nameservers to propagate globally across all internet service providers. During this transition window, your website will experience zero downtime, as both your old and new nameservers possess the exact same DNS records.
Step 4: Optimize Cloudflare Settings for Shared Hosting
While waiting for the nameservers to propagate, you can configure Cloudflare’s internal settings to maximize performance and avoid common SSL redirect loops.
1. SSL/TLS Encryption Mode
If you already have a free SSL certificate installed on your shared hosting account (like an AutoSSL or Let’s Encrypt certificate generated via cPanel), you must configure Cloudflare to respect it.
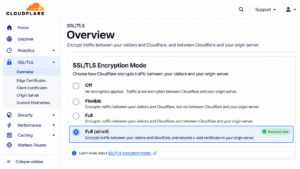
Navigate to the SSL/TLS tab in the left sidebar.
- Flexible: Cloudflare encrypts traffic from the visitor to Cloudflare, but not from Cloudflare to your server. (Not recommended for security).
- Full: Encrypts traffic end-to-end, but does not strictly validate the origin certificate.
- Full (Strict): Encrypts traffic end-to-end and requires a valid, unexpired SSL on your shared server.
Best Practice: Select Full or Full (Strict). If you select “Flexible” while your WordPress site is already forcing HTTPS, your website will get stuck in an “ERR_TOO_MANY_REDIRECTS” loop, breaking your site entirely.
2. Auto Minify (Speed)
Navigate to Speed > Optimization in the left sidebar. Under the Auto Minify section, check the boxes for JavaScript, CSS, and HTML. Cloudflare will strip unnecessary characters (like whitespace and comments) from your site’s code on the fly, reducing file sizes and improving your Google PageSpeed Insights scores without requiring heavy WordPress caching plugins.
3. Always Use HTTPS
Under the SSL/TLS > Edge Certificates menu, toggle on the Always Use HTTPS option. This ensures that any visitor who manually types http:// is automatically and securely redirected to the secure https:// version of your site at the edge network level, which is faster than relying on a WordPress plugin to execute the redirect.
Step 5: Verification and Testing
After configuring your settings and allowing time for DNS propagation, verify the setup is active.
- Check your Cloudflare dashboard overview. The status should change from “Pending Nameserver Update” to a green checkmark stating “Great news! Cloudflare is now protecting your site.”
- Open your website in an incognito window to ensure it loads correctly and the SSL padlock is visible.
- To confirm assets are being served by the CDN, right-click on your loaded website and select Inspect to open Developer Tools. Navigate to the Network tab, reload the page, and click on an image or CSS file. Look at the Response Headers on the right side. If you see
cf-cache-status: HITorserver: cloudflare, the integration is successful and your shared server is now offloading bandwidth to the CDN.
Frequently Asked Questions
1. Will using Cloudflare’s free plan slow down my website?
No. Cloudflare’s infrastructure is significantly faster and more robust than any standard shared hosting environment. By serving cached static assets from edge nodes geographically closer to your visitors, TTFB (Time to First Byte) is heavily reduced.
2. My website says “ERR_TOO_MANY_REDIRECTS” after enabling Cloudflare. How do I fix it?
This is caused by an SSL loop. Your WordPress site is trying to force HTTPS, but Cloudflare is set to “Flexible” SSL mode (sending HTTP requests to your server). To resolve this instantly, log into Cloudflare, go to the SSL/TLS tab, and change the encryption mode from Flexible to Full or Full (Strict).
3. Does Cloudflare replace my web hosting?
No. Cloudflare is a proxy and a CDN; it is not a web host. You still need your shared hosting account (like Hostinger, Bluehost, or SiteGround) to store your physical WordPress files, database, and process dynamic PHP requests.
4. Do I need a caching plugin in WordPress if I use Cloudflare?
Yes. Cloudflare caches static assets (images, CSS, JS) on its edge network. However, it does not cache dynamic HTML pages by default on the free plan. Using a lightweight WordPress caching plugin (like WP Super Cache or LiteSpeed Cache) alongside Cloudflare yields the best performance, as the plugin caches the PHP execution while Cloudflare handles the static delivery.
Sources and References
- Cloudflare Help Center: Getting Started with Cloudflare.
- cPanel Documentation: Managing DNS and External Nameservers.
- Google Developers: Optimizing TTFB and Network Routing.