If you’ve been running websites for any length of time, you already know that manual maintenance is a massive time sink. Whether it’s clearing out expired database transients, generating weekly XML sitemaps, or forcing a backup protocol, doing things by hand is a recipe for forgotten tasks and broken sites.
Enter the Cron Job. Think of a cron job as your web server’s invisible, hyper-punctual butler. Operating silently in the Linux background, the “cron daemon” is a time-based job scheduler. You hand it a specific script and tell it exactly when to run—down to the minute—and it executes that command relentlessly, 24/7/365, without ever asking for a coffee break.
While interacting with server commands can feel intimidating if you aren’t a systems administrator, cPanel provides a visual interface that makes scheduling these tasks incredibly straightforward. In this workshop-style guide, we are going to break down exactly how to translate human time into “cron time,” how to write the commands that actually do the work, and how to offload heavy tasks (like WordPress virtual crons) to your server to instantly boost your website’s performance.
Decoding the Matrix: Understanding Cron Time Format
Before you click any buttons in cPanel, you have to understand how a Linux server reads time. When you create a cron job, you don’t select “Every Tuesday at 3 PM” from a dropdown. Instead, you use a sequence of five asterisks, separated by spaces.
These five fields represent:Minute — Hour — Day (of month) — Month — Day (of week)
By replacing those asterisks with numbers, you create a schedule. Here is the cheat sheet you need to memorize (or bookmark):
*(Asterisk): Means “every.” (e.g., every minute, every day).,(Comma): Allows you to list multiple values (e.g.,1,15,30in the minute field means the 1st, 15th, and 30th minute).-(Hyphen): Defines a range (e.g.,1-5in the weekday field means Monday through Friday)./(Slash): Defines a step value (e.g.,*/5in the minute field means every 5 minutes).
Let’s look at a few practical, real-world examples:
0 * * * *— Runs at the top of every single hour (e.g., 1:00, 2:00, 3:00).0 0 * * *— Runs at midnight (00:00) every single day.30 15 * * 5— Runs at exactly 3:30 PM (15:30 on a 24-hour clock) every Friday (the 5th day of the week, where Sunday is 0).0 0 1 * *— Runs at midnight on the first day of every month.
Don’t worry if this feels like learning a new language. cPanel has built-in presets for common schedules, but knowing the raw syntax allows you to build highly customized automation workflows.
The Real-World Use Case: Why You Need to Offload WP-Cron
To understand the sheer power of server-level cron jobs, we need to look at WordPress. By default, WordPress handles its own scheduled tasks (like publishing scheduled posts or checking for plugin updates) using a file called wp-cron.php.
However, WordPress doesn’t have a real clock. It uses a “virtual” cron. It only checks to see if tasks need to be run when a user visits your website.
If you run a low-traffic site, your scheduled posts might publish hours late because nobody visited the site to trigger the check. Conversely, if you run a high-traffic site, every single visitor is triggering that wp-cron.php file simultaneously, causing massive CPU spikes and crippling your shared hosting resources.
The ultimate fix? Disable the WordPress virtual cron and tell your cPanel server to run it on a strict, steady schedule instead.
Step 1: Disabling the Default Virtual Cron
Before setting up the server-side automation, we need to shut off the inefficient default system.
- Log into your cPanel dashboard and open the File Manager.
- Navigate to your website’s root folder (usually
public_html). - Find your
wp-config.phpfile, right-click, and select Edit. - Scroll down until you see the line
/* That's all, stop editing! Happy publishing. */. - Right above that line, paste the following code:
define( 'DISABLE_WP_CRON', true ); - Save the file. WordPress is now completely stripped of its scheduling abilities. If you stop here, your site will eventually break. Let’s fix that in Step 2.
Step 2: Creating the Real Cron Job in cPanel
Now, we hand the responsibility over to your server.
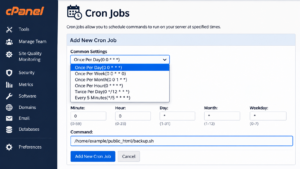
- Head back to the main cPanel dashboard. Scroll down to the Advanced section and click on Cron Jobs.
- First, you’ll see a section for a Cron Email. By default, the server will send you an email every single time a cron job runs. Leave this alone for now so we can test it, but we will silence it later.
- Scroll down to the Add New Cron Job section.
- In the Common Settings dropdown, select Twice Per Hour (0,30 * * * *). This is the perfect balance for most websites—it ensures scheduled posts go out on time without overloading the server.
- You will see the asterisk fields automatically populate based on your selection.
- Now, in the Command field, you need to tell the server what exactly to execute. To trigger the WordPress cron we just disabled, paste the following command (replace
yourwebsite.comwith your actual domain):wget -q -O - [https://yourwebsite.com/wp-cron.php?doing_wp_cron](https://yourwebsite.com/wp-cron.php?doing_wp_cron) >/dev/null 2>&1 - Click Add New Cron Job.
Congratulations. You have just drastically improved your website’s performance and stability.
Understanding Command Syntax: Wget, cURL, and PHP
In the example above, we used wget. But when you start reading plugin documentation or interacting with third-party APIs, you’ll see different types of commands. Let’s break down the three most common ways to execute a script via cPanel.
1. The wget Command
wget is a command-line utility used to download files from the web. When used in a cron job, it essentially tells the server, “Act like a web browser, visit this URL, and download whatever it spits out.”
- Syntax:
wget -q -O - [https://example.com/script.php](https://example.com/script.php) - (The
-qmeans “quiet” to suppress output, and-O -tells it to output to the standard display rather than saving a file).
2. The cURL Command
cURL is very similar to wget but is much more powerful for interacting with modern APIs, handling redirects, and sending data (like POST requests). Many developers prefer cURL.
- Syntax:
curl -s [https://example.com/script.php](https://example.com/script.php) - (The
-sflag stands for “silent” so it doesn’t print a progress meter).
3. The Direct PHP Command
Sometimes, you don’t want to access a script via a public URL. Instead, you want the server’s PHP engine to execute the file directly from the hard drive. This is faster and more secure because it bypasses the web server entirely. To do this, you must use the absolute server path.
- Syntax:
/usr/local/bin/php /home/yourcpanelusername/public_html/script.php - (Note: The exact location of the PHP binary
/usr/local/bin/phpcan vary depending on your hosting provider. Some hosts just requirephpinstead of the full path).
The Art of Silence: Managing Cron Output and Spam
If you set a cron job to run every 5 minutes, and it generates an output (even a simple “Success” message), your server will email you 288 times a day. Your inbox will be destroyed, and eventually, your server’s mail queue will crash. You must intentionally silence cron jobs that are working correctly.
Look back at the WordPress command we used earlier. Notice the weird string of characters at the very end?>/dev/null 2>&1
This is Linux command-line magic.
>/dev/nulltells the server to take any standard output from the script and throw it into the “black hole” of the server (meaning, discard it immediately).2>&1tells the server to take any error messages (Command 2) and redirect them to the same black hole as the standard output (Command 1).
If you want to receive emails only when the script fails and throws an error, you would use this instead:>/dev/null (This discards the success messages, but lets the errors trigger an email).
Troubleshooting When Things Don’t Fire
If your cron job isn’t working, it almost always comes down to one of three culprits:
- Wrong Absolute Path: If you are using the PHP command method, you cannot just write
public_html/script.php. You must include the full path starting from the server root. You can find this path on the right-hand sidebar of the main cPanel dashboard (usually listed as “Home Directory”, e.g.,/home/username/). - Permissions Issues: The file you are trying to execute must have the correct file permissions to run. Navigate to the file in your cPanel File Manager, right-click, and check “Permissions.” It typically needs to be set to
0644or0755depending on your server’s security configuration. - Command Line Blocking: Some aggressive shared hosting providers disable
wgetandcurlvia the command line to prevent malicious activity. If your commands are failing silently, contact your host’s support team and ask if they have disabledallow_url_fopenor restrictedcURLexecution in the server firewall.
Mastering cron jobs elevates you from a passive website owner to a proactive server administrator. By offloading heavy tasks and automating your maintenance, you guarantee your site runs faster, stays updated, and scales without manual intervention.
Frequently Asked Questions
1. How many cron jobs can I run on a shared hosting account?
There is no hard limit on the number of jobs, but there are strict limits on server resources (CPU/RAM). If you schedule 10 heavy database cleanup scripts to run at the exact same minute, your account will likely trigger a 508 Resource Limit error and be temporarily suspended. Always stagger your cron jobs (e.g., run one at 1:00 AM, the next at 1:15 AM).
2. Why did I receive an email saying “No input file specified”?
This means your cron job triggered, but the server couldn’t find the file you pointed it to. You likely have a typo in your file path, or you are using a relative path instead of an absolute server path. Double-check your cPanel home directory structure.
3. Can I run Python or Node.js scripts via cPanel cron jobs?
Yes, provided your hosting environment supports those languages. Instead of pointing to the PHP binary, you would point to the Python or Node binary (e.g., /usr/bin/python3 /home/user/public_html/script.py).
4. How do I delete or pause a cron job?
To pause a job temporarily without losing the command, edit the cron job and remove the scheduling asterisks, changing them to a date far in the future. To delete it entirely, go to the “Current Cron Jobs” table at the bottom of the cPanel Cron interface and click the “Delete” button next to the relevant task.
Sources and References
- cPanel & WHM Official Documentation: Cron Jobs Interface Management.
- Ubuntu Linux Manual Pages (man): Crontab (5) – Tables for driving cron.
- WordPress Developer Resources: Hooking into WP-Cron and System Scheduling.