Operating systems are incredibly complex networks of millions of system files. If even one of these critical files becomes damaged, deleted, or corrupted, Windows will start showing signs of instability. Whether you are experiencing sudden Blue Screen of Death (BSOD) errors, applications crashing without explanation, missing DLL warnings, or core Windows settings failing to load, the culprit is often a corrupted system file.
Fortunately, you do not need to reinstall Windows to resolve these issues. Windows comes with a highly effective, built-in diagnostic tool called the System File Checker (SFC). When run via the Command Prompt, SFC scans your entire system, identifies damaged or missing core OS files, and automatically replaces them with healthy, cached versions.
This step-by-step guide will walk you through how to use SFC commands to repair your PC, how to interpret scan results, and what to do if SFC fails to resolve the issue.
Why Do Windows System Files Become Corrupted?
Before running the repair tools, it is helpful to understand why corruption occurs. Some of the most common reasons include:
- Abrupt Power Outages: If your PC shuts down unexpectedly while writing files to your hard drive, those files can easily become corrupted.
- Malware and Viruses: Malicious software can deliberately damage or replace core system files to hijack your PC or disable security features.
- Bad Windows Updates: An interrupted system update or a poorly optimized patch can occasionally corrupt system resources.
- Hardware Failure: Bad sectors on a failing Hard Drive (HDD) or Solid-State Drive (SSD), as well as malfunctioning RAM, can degrade your system files.
- Improper Software Installations: Certain low-level software (like third-party antivirus or system tuning utilities) can write over critical Windows files.
Step 1: Launch the Command Prompt as an Administrator
The System File Checker requires high-level system permissions to scan and modify protected Windows files. Therefore, you must run the Command Prompt with Administrative privileges.
- Click on the Windows Start menu or press the Windows Key.
- Type cmd or Command Prompt into the search bar.
- In the search results, right-click on Command Prompt and select Run as administrator (or click “Run as administrator” on the right preview pane).
- A User Account Control (UAC) pop-up will ask, “Do you want to allow this app to make changes to your device?” Click Yes.
Once open, look at the title bar of the console. It must read Administrator: Command Prompt, and your starting path should be C:\Windows\System32>. If it only says “Command Prompt” or opens in C:\Users\YourName>, the commands will fail with an “access denied” error.
Step 2: Run the SFC Command (sfc /scannow)
Now that you have the administrative Command Prompt open, you are ready to initiate the scan.flat vector illustration of a Command Prompt window in Administrator mode executing ‘sfc /scannow’ with a percentage loading bar, Windows style UI, dark console, 2D infographic style
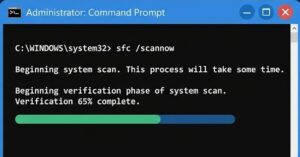
- In the console, type the following command exactly as shown and press Enter:
sfc /scannow - Once you press Enter, the utility will launch. It starts with: “Beginning system scan. This process will take some time.”
- Next, it will show a live percentage of the verification phase: “Beginning verification phase of system scan.”
- Important: Do not close the Command Prompt or turn off your computer while this scan is running. Even if the progress bar appears to “freeze” at 10% or 60%, please wait. It is scanning thousands of highly sensitive system files one by one. The process typically takes 10 to 30 minutes, depending on your system’s hardware (SSD vs. HDD) and current file volume.
Once the verification reaches 100%, Windows will print out one of four major diagnostic messages.
Step 3: Understanding the SFC Scan Results
When the process completes, carefully read the text output at the bottom of your command screen. It will dictate your next troubleshooting steps:
Result A: “Windows Resource Protection did not find any integrity violations.”
- What it means: Congratulations! Your core Windows system files are entirely intact and healthy.
- Next Steps: Since your system files are not corrupted, any errors, performance issues, or crashes you are experiencing must be caused by something else. We recommend testing your hardware, running a malware scan, checking for third-party application conflicts, or updating your graphics and device drivers.
Result B: “Windows Resource Protection found corrupt files and successfully repaired them.”
- What it means: This is exactly the result we want to see. SFC found damaged or missing files and successfully replaced them with a fresh, pre-cached local backup copy.
- Next Steps: A detailed log of what files were fixed has been saved to your
CBS.logfile (C:\Windows\Logs\CBS\CBS.log). You should restart your computer and test it. The glitches or crashes you were facing should now be resolved.
Result C: “Windows Resource Protection could not perform the requested operation.”
- What it means: A system file or an active system process is blocking the SFC utility from scanning or writing file repairs to your disk.
- Next Steps: To resolve this error, you need to run the SFC scan either in Safe Mode or offline using the Windows Recovery Environment (WinRE) to prevent other background apps or processes from locking up those critical system directories. (We will cover how to do this in Step 5).
Result D: “Windows Resource Protection found corrupt files but was unable to fix some of them.”
- What it means: The SFC scanner detected corruption, but it couldn’t fix them. This often happens because the local backup file cache itself is damaged, meaning SFC doesn’t have a healthy file to copy over.
- Next Steps: You will need to use the Deployment Image Servicing and Management (DISM) tool to repair your local backup image using online Microsoft resources before running SFC again.
Step 4: What to Do If SFC Fails (Run the DISM Command)
If SFC found errors but was unable to repair them (Result D), you have to utilize the Deployment Image Servicing and Management (DISM) tool. While SFC checks individual file integrity, DISM manages and repairs the overall Windows system image. Think of it this way: DISM acts as the mechanic that updates the blueprint, and SFC is the construction worker that builds the file repairs.
You must run these online DISM commands to resolve deep corruption:
- Keeping your administrative Command Prompt open, type the following command to check if there is any image corruption and press Enter:
DISM /Online /Cleanup-Image /ScanHealth-
(Note: This simply scans the image. It might take several minutes).
-
- Once that scan finishes, type the next command to inspect the system image’s integrity and press Enter:
DISM /Online /Cleanup-Image /CheckHealth - If errors or image corruptions are identified, download a fresh, official online payload from Microsoft’s servers to patch and repair the local file cache. Input the command and press Enter:
DISM /Online /Cleanup-Image /RestoreHealth - Be Patient: The
/RestoreHealthcommand is downloading official copies of corrupted files directly from Windows Update. Because of this, it will require an active internet connection. The progress bar may seem to stall at 20% or 80%, but this is normal. Allow the process to complete entirely (typically 10-20 minutes). - Once DISM finishes and displays “The restore operation completed successfully,” your backup repository is fully repaired.
- Now, run the SFC Command again: Type
sfc /scannowand press Enter. This time, since DISM has successfully repaired the local backup repository, SFC will have the necessary files to replace any corrupted or missing system items, resolving “Result D” once and for all.
Step 5: How to Run SFC in Safe Mode or Recovery Environment
If your PC gets stuck in a boot loop or if you receive a “Windows Resource Protection could not perform the requested operation” error (Result C), you will need to run the repair command from Safe Mode or when Windows is offline (before the OS files are fully loaded).
Method 1: Running SFC in Safe Mode
- Click the Start Menu, click the Power icon, then hold down the Shift key while you click Restart. This will boot your computer into the Windows Recovery options menu.
- Go to Troubleshoot > Advanced options > Startup Settings, and click Restart.
- On reboot, you will see a list of numbered startup options. Press 4 or F4 on your keyboard to enable Safe Mode.
- Once you are booted into Safe Mode (where your background is black and many apps/drivers are disabled), run the Command Prompt as Administrator and execute
sfc /scannow.
Method 2: Running SFC from the Advanced Recovery Command Prompt
- Hold Shift while clicking Restart to access the advanced startup screen.
- Navigate to Troubleshoot > Advanced options > Command Prompt.
- Your computer will reboot into a lightweight command-line environment. Unlike the standard console, your main system drive might be assigned a different letter (often
D:instead ofC:). - Run the utility offline by specifying exactly where Windows is installed:
sfc /scannow /offbootdir=C:\ /offwindir=C:\windows(If your OS drive is D:, change the letters to match). This allows SFC to repair system files without any of them being locked or in use.
Frequently Asked Questions
1. Is running the sfc /scannow command safe?
Yes, running SFC is completely safe. It is a built-in Windows diagnostic utility designed only to inspect and restore corrupted, missing, or altered system files. It will never touch, modify, or delete your personal files like photos, documents, music, or game files.
2. How often should I run an SFC scan?
There is no need to run SFC scans routinely. However, you should use it whenever your PC experiences unexpected system crash errors, slow boot times, application launches failing, Blue Screens of Death (BSOD), or after a malware cleanup to ensure no core system resources were damaged.
3. What is the difference between SFC and CHKDSK?
While both check system health, they target entirely different problems:
- SFC (System File Checker) inspects, verifies, and repairs individual Windows system and OS files (like DLLs and EXEs).
- CHKDSK (Check Disk) inspects and repairs physical and logical errors on your hard drive’s file system, such as bad sectors, disk fragmentation, and file alignment. Run CHKDSK if you suspect your hard drive itself is failing.
4. What should I do if both SFC and DISM fail?
If SFC and DISM cannot resolve the issue, you may need to rely on System Restore to roll back your PC to a point when it was working correctly, or perform a “Reset this PC” from Windows settings (selecting the “Keep my files” option) to re-install a completely clean, uncorrupted copy of the Windows operating system.
5. Can I use my computer while SFC is running?
Yes, you can theoretically continue using your computer, but it is highly recommended to close all other applications and let the scan run uninterrupted. Running other programs can lock files that SFC is actively trying to examine or replace, potentially leading to errors or longer scan times.
Sources & References
- Microsoft Support: Using System File Checker in Windows
- Microsoft Learn: Deployment Image Servicing and Management (DISM) overview
- Windows OS Recovery and Maintenance Guides (Official documentation on SFC and WinRE).