A brand-new Windows 11 installation boots to the desktop in seconds and idles at a fraction of your available memory. Give that same machine six months of everyday software installations, however, and the boot experience changes dramatically. Fans spin up immediately after login, the taskbar takes ten seconds to become responsive, and four to six gigabytes of RAM are already consumed before you even open a web browser.
The culprit is rarely the Windows 11 kernel itself. Instead, almost every modern desktop application—from game launchers and cloud storage clients to PDF readers and peripheral RGB controllers—registers itself to launch automatically the moment you sign in. Worse yet, many heavy applications split their footprint across standard startup entries, background system services, and scheduled tasks so they can continue running even after you close their main window.
Reclaiming your system’s boot speed and freeing up memory requires more than just unchecking a few boxes in the basic settings menu. Below is a complete technical walkthrough covering every location where background programs hide in Windows 11, how to shut them down safely, and which core processes you should leave alone.
How Windows 11 Measures Startup Impact and Resource Drain
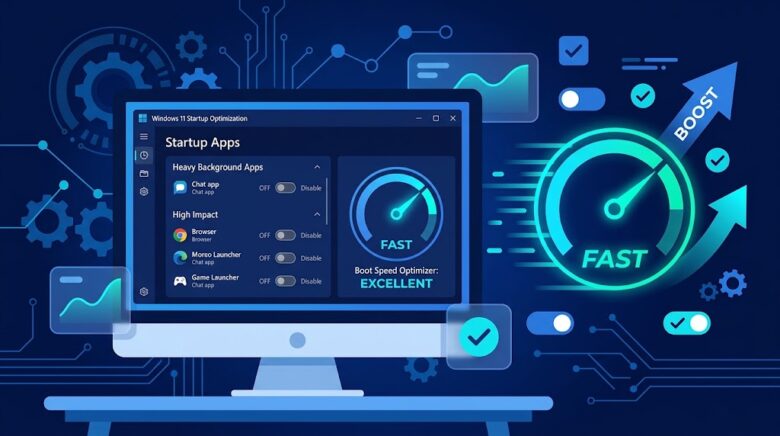
Before disabling applications at random, it helps to understand how Windows 11 evaluates startup behavior. Whenever you log into your user profile, the operating system monitors how much CPU time (measured in milliseconds) and disk I/O (measured in bytes read and written) each auto-starting process consumes during the initialization window.
- High Impact: Applications that consume more than 1,000 milliseconds of CPU time or exceed several megabytes of disk activity during login. Game clients (Steam, Epic Games Launcher), communication platforms (Discord, Microsoft Teams), and creative suites (Adobe Creative Cloud) almost always fall into this bracket.
- Medium and Low Impact: Lightweight tray utilities that initialize quickly, though they may still allocate hundreds of megabytes of RAM once idle in the background.
- Not Measured: Applications that either delay their launch until a few minutes after login or execute via system-level services before your user profile loads.
A program marked as “Low Impact” can still degrade long-term performance if it spawns Chromium-based helper processes (such as Microsoft Edge WebView2 instances) that sit in your system memory all day.
Method 1: Auditing Startup Apps via the Windows 11 Task Manager
The Task Manager remains the fastest and most informative tool for cutting down post-login bloat because it exposes both the startup impact rating and the system’s BIOS initialization time.
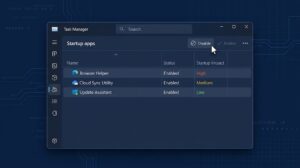
- Press Ctrl + Shift + Esc on your keyboard to launch Task Manager directly, or right-click the taskbar and select Task Manager.
- If Task Manager opens in a compact view, click the navigation menu in the upper-left corner and select Startup apps (represented by a speedometer icon).
- Click the Startup impact column header to sort all entries from High to Low, bringing the heaviest resource offenders to the top of your screen.
- Check the upper-right corner for the Last BIOS time metric, which tells you how many seconds your motherboard took to initialize hardware before handing control to Windows.
- Select any non-essential third-party application showing a High or Medium rating, then click Disable in the top action bar (or right-click the entry and choose Disable).
Disabling an application here does not uninstall it or break its functionality. If you disable Spotify, Steam, or Zoom from the Startup apps tab, those programs will simply wait until you click their desktop shortcut before loading into memory.
If you come across an unfamiliar executable name in the list, right-click the entry and select Properties to inspect its digital signature and installation directory, or choose Search online to verify whether it belongs to a hardware driver or third-party bloatware.
Method 2: Restricting UWP and Microsoft Store Background Apps
Traditional desktop programs (Win32 applications) are only half the equation. Windows 11 also runs Universal Windows Platform (UWP) apps installed through the Microsoft Store. Even if these apps do not appear in the standard Startup list, Windows allows many of them to wake up periodically, fetch notifications, sync data, and consume CPU cycles in the background.
To stop store apps from running silently behind the scenes:
- Press Windows Key + I to open the Settings app and select Apps from the left navigation pane.
- Click Installed apps at the top of the list to view every package registered on your PC.
- Scroll through the list to locate built-in or Store-installed software you rarely use (such as Xbox, Clipchamp, Cortana, Skype, or third-party media apps).
- Click the three-dot menu icon on the far right of the app’s row and select Advanced options.
- Look for the Background apps permissions section near the top of the page.
- Change the dropdown menu under “Let this app run in background” from Power optimized (recommended) or Always to Never.
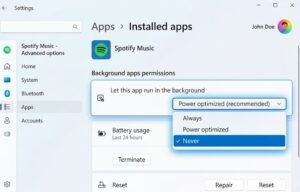
Note that classic Win32 installers do not display the Advanced options button here; this control specifically governs packaged modern apps that utilize Windows background task brokers.
Method 3: Clearing Legacy User and System Startup Folders
Long before modern settings menus existed, Windows relied on dedicated file system directories to launch programs upon login. Many enterprise tools, custom scripts, portable utilities, and older software packages still drop shortcuts directly into these folders. While some of these appear in Task Manager, inspecting the directories manually ensures no hidden batch scripts or shortcut links slip past your audit.
Windows 11 maintains two separate startup folders: one for your personal user account and a global folder that runs for every user profile on the machine.
- Press Windows Key + R to open the Run dialog box.
- Type shell:startup and press Enter to open your personal User Startup folder in File Explorer.
- Review the shortcuts inside this folder and delete any application shortcuts you no longer want launching automatically at login.
- Open the Run dialog again (Windows Key + R), type shell:common startup, and press Enter to open the All Users Startup directory.
- Delete any unwanted third-party shortcuts from this directory (administrator permission is required to modify this folder).
Deleting a shortcut from either folder only removes the auto-launch trigger; the actual program remains safely installed in your Program Files directory.
Method 4: Disabling Heavy Third-Party Services via System Configuration
Have you ever disabled an application in Task Manager, rebooted your computer, and noticed its background processes are still running in your RAM? This happens because heavy software suites—including Adobe Creative Cloud, Google Chrome/Edge updaters, VPN clients, and anti-cheat engines—install background Windows Services that launch before your desktop even loads.
You can safely tame these persistent background services using the System Configuration utility, provided you filter out Microsoft’s core operating system services first:
- Press Windows Key + R, type msconfig, and press Enter to launch the System Configuration window.
- Switch to the Services tab at the top of the dialog box.
- Check the box labeled Hide all Microsoft services at the bottom-left corner of the window. Do not skip this step—disabling core Microsoft services can break Windows Update, networking, audio, or system login.
- Once all Microsoft services are hidden, the remaining list shows strictly third-party background services installed by external software and hardware vendors.
- Uncheck heavy background services associated with software you do not need running 24/7, such as Adobe Acrobat Update Service, third-party browser update daemons, unused VPN tunnels, or printer status monitors for printers you rarely turn on.
- Click Apply, select OK, and restart your PC when prompted.
When auditing this list, leave essential hardware services checked—such as NVIDIA Display Container LS, AMD External Events Utility, Intel Management Engine, or Realtek Audio Universal Service—alongside any active anti-cheat service required by multiplayer games you play regularly.
Method 5: Hunting Hidden Auto-Launch Triggers in Task Scheduler
Several modern applications bypass both the Startup folder and the Services list by registering scheduled tasks that trigger “At log on” or “At system startup.” Software updaters and telemetry reporters rely heavily on this method because users rarely think to check the Windows Task Scheduler.
- Press Windows Key + R, type taskschd.msc, and press Enter to open the Task Scheduler console.
- Click Task Scheduler Library in the left-hand folder tree to view top-level scheduled tasks registered by third-party applications.
- Expand the Triggers column in the center pane so you can clearly see which tasks are set to fire At log on of any user or At system startup.
- Select any non-essential third-party updater or background helper task, right-click it, and choose Disable from the context menu.
- Avoid deleting tasks outright; disabling them stops them from executing while allowing you to re-enable them with a single click if an application ever complains during a manual update check.
Method 6: Cleaning Orphaned Startup Keys in the Windows Registry
When you uninstall poorly coded software, it sometimes leaves behind orphaned entries in the Windows Registry or locks startup toggles that refuse to stay off in Settings. Advanced users can inspect the two primary registry Run keys where Windows 11 stores startup instructions:
- Press Windows Key + R, type regedit, and press Enter (click Yes at the User Account Control prompt).
- Before making any modifications, click File > Export in the top menu to save a quick backup of your current registry state.
- Navigate to the current user startup key by pasting the following path into the Registry Editor address bar:HKEY_CURRENT_USER\Software\Microsoft\Windows\CurrentVersion\Run
- Inspect the string values in the right-hand pane, where each entry shows the program name and the exact file path it executes at login.
- Right-click and Delete any leftover entry pointing to software you have already uninstalled or no longer want running at boot.
- Repeat the inspection for system-wide 64-bit and 32-bit startup programs at these two locations:
-
-
HKEY_LOCAL_MACHINE\Software\Microsoft\Windows\CurrentVersion\Run
-
HKEY_LOCAL_MACHINE\Software\WOW6432Node\Microsoft\Windows\CurrentVersion\Run
-
If you prefer a visual interface over raw registry keys, Microsoft offers an official utility called Autoruns (part of the Microsoft Sysinternals suite). Autoruns aggregates every registry Run key, startup folder, scheduled task, and non-Microsoft service into a single color-coded interface, highlighting missing file paths in yellow so you can uncheck orphaned entries safely.
Which Startup Programs Should You Never Disable?
While paring down your startup list can shave 15 to 30 seconds off your boot time and free up gigabytes of RAM, disabling the wrong entry can cause missing audio, broken trackpad gestures, or deactivated security alerts. Always leave the following categories enabled:
- Windows Security Notification Icon (SecurityHealthSystray.exe): Provides the system tray interface for Windows Defender. Disabling the tray icon does not turn off your antivirus engine, but it hides critical security alerts and firewall prompts.
- Audio and Chipset Controllers: Entries such as Realtek HD Audio Universal Service, Waves MaxxAudio, or Dolby Access manage headphone jack detection and microphone noise suppression on laptops and desktops.
- Graphics and Display Utilities: Processes from NVIDIA, AMD, or Intel that handle display scaling, variable refresh rate (G-Sync/FreeSync), and color profiles.
- Laptop Input and Power Managers: Synaptics, ELAN, or Windows Precision Touchpad helpers, as well as lightweight OEM hotkey utilities that control keyboard backlighting and battery charge thresholds.
Frequently Asked Questions
1. Does disabling a startup program in Task Manager uninstall the app?
No. Disabling an application in Task Manager or Windows Settings only stops it from launching automatically when you turn on your PC. The program remains fully installed and will work normally whenever you open it manually from the Start menu or desktop shortcut.
2. Why does Microsoft Edge keep running in the background even after I disable it in Startup apps?
Microsoft Edge includes two internal features called Startup boost and Continue running background extensions and apps when Microsoft Edge is closed. To stop Edge from loading in the background, open Edge, go to Settings > System and performance, and toggle both of those switches off.
3. What is a good Last BIOS time in Windows 11?
On a modern desktop or laptop equipped with an NVMe SSD and Fast Boot enabled, a typical Last BIOS time ranges between 3 and 12 seconds. Desktop workstations with DDR5 memory training or multiple external drives attached may take 15 to 25 seconds, which is normal for those hardware configurations.
4. Can disabling background services in msconfig stop Windows 11 from booting?
Only if you fail to check the Hide all Microsoft services box before unchecking items. As long as all core Microsoft services remain hidden and untouched, disabling third-party application services will not prevent Windows 11 from booting to the desktop.
5. Why do some apps re-enable themselves in the Startup list after a few days?
Applications like Spotify, Discord, and Steam often manage their own startup preferences inside their internal settings menus. When those programs install an automatic update, their internal settings can overwrite your Windows Task Manager preference and re-register the startup key. Turning off the “Open at login” toggle directly inside the app’s own preferences menu prevents it from coming back.
Sources & References
- Microsoft Support: Configure Startup Applications in Windows 11.
- Microsoft Learn: System Configuration (msconfig) and Background Task Management Architecture.
- Microsoft Sysinternals Documentation: Autoruns for Windows v14 Technical Guide.
- Windows Performance Toolkit (WPT): Boot and Post-On/Off Transition Performance Analysis.