Few things disrupt a workflow or gaming session faster than sudden system stutter accompanied by laptop or desktop fans roaring at maximum RPM. When you press Ctrl + Shift + Esc to inspect Task Manager, you will often find a single background process sitting at the very top of the CPU and Disk columns: Antimalware Service Executable (MsMpEng.exe). Even on modern multi-core processors, this process can unexpectedly consume 30% to 80% of your CPU resources and hundreds of megabytes of RAM for extended periods.
Because Antimalware Service Executable is the core background engine of Microsoft Defender Antivirus (formerly Windows Defender), Windows protects the process with kernel-level permissions. Clicking “End task” in Task Manager results in an immediate “Access is denied” error. Worse yet, attempting to disable your antivirus entirely leaves your operating system exposed to ransomware and trojans.
Instead of gutting your system security, you can tame MsMpEng.exe by fixing the exact scanning loops, thread priority conflicts, and corrupted definition caches that trigger the CPU spikes. Below is a complete technical guide to reducing Antimalware Service Executable CPU usage down to idle levels while keeping your PC protected.
What Is Antimalware Service Executable (MsMpEng.exe) and Why Does It Spike?
Located natively in C:\ProgramData\Microsoft\Windows Defender\Platform, the MsMpEng.exe binary handles real-time file system monitoring, heuristic behavior analysis, cloud-delivered protection checks, and scheduled background scans. Whenever a file is created, compiled, extracted, or modified on your storage drive, Microsoft Defender intercepts the operation to inspect the payload before allowing it to execute.
High, sustained CPU utilization almost always stems from one of four technical bottlenecks:
- Real-Time Scanning Loops on Dynamic Directories: When you launch a modern game that compiles shaders on the fly, extract massive
.zipor.rararchives, run virtual machines, or compile code in IDEs (like Visual Studio or Node.js), Defender scans thousands of temporary files per second. - Aggressive “Catch-Up” Scheduled Scans: By default, Windows schedules background maintenance scans with elevated thread priority. If your PC was turned off during a scheduled window, Defender forces a catch-up scan the moment you log in and start working.
- Corrupted Virus Definition Caches: If a daily signature update fails mid-download or encounters a damaged local database, the Defender engine can get stuck in an infinite verification loop.
- Nested Archive and Network Parsing: Scanning deep inside multi-gigabyte compressed archives,
.isodisk images, or mapped network drives forces the CPU to decompress streams in memory continuously.
Fix 1: Reschedule and Lower the Priority of Windows Defender Scans
One of the main reasons Antimalware Service Executable bogs down your computer right after boot is its Task Scheduler configuration. Out of the box, the scheduled scan task is configured to run with the highest system privileges and trigger even when you are actively using the machine.
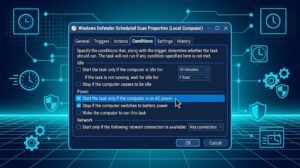
Modifying this task lowers its execution priority and restricts background scans to off-peak hours:
- Press Windows Key + R to launch the Run dialog box, type taskschd.msc, and press Enter to open the Task Scheduler.
- In the left-hand console tree, expand Task Scheduler Library > Microsoft > Windows.
- Scroll down the folder list and click on Windows Defender.
- In the center pane, double-click Windows Defender Scheduled Scan to open its Properties window.
- Under the General tab, uncheck the box labeled Run with highest privileges at the bottom.
- Switch to the Conditions tab and uncheck all boxes under the Idle, Power, and Network sections so Windows does not force-trigger scans when switching power states or waking from sleep.
- Switch to the Triggers tab and click New… at the bottom.
- Set the scan to run Weekly on a single day at a time when you rarely use the PC, and click OK.
- Click OK to save the updated properties and close Task Scheduler.
Fix 2: Cap Maximum CPU Utilization Using PowerShell
Many users are unaware that Microsoft builds a native CPU throttling limit directly into the Defender engine (ScanAvgCPULoadFactor). By default, Windows allows Microsoft Defender to consume up to 50% of your processor’s total capacity during background scans. You can lower this ceiling to 15% or 20% using a single administrative PowerShell command.
- Right-click the Start button and select Terminal (Admin) or PowerShell (Admin).
- Click Yes when prompted by User Account Control (UAC).
- First, check your current CPU limit setting by typing the following command and pressing Enter:
Get-MpPreference | Select-Object ScanAvgCPULoadFactor - To restrict Microsoft Defender background scans to a maximum of 20% CPU usage, run this command:
Set-MpPreference -ScanAvgCPULoadFactor 20 - Next, instruct Defender to run scheduled scans at low thread priority so foreground apps and games always get CPU cycles first:
Set-MpPreference -ScanOnlyIfIdleEnabled $true
Note that ScanAvgCPULoadFactor accepts any integer value between 5 and 100. Setting it to 20 ensures background scans take slightly longer to finish in exchange for keeping your system completely responsive.
Fix 3: Add Folder Exclusions for Heavy Games, Dev Directories, and Archives
If Antimalware Service Executable only spikes when you open a specific game, video editing project, virtual machine, or coding workspace, real-time protection is repeatedly scanning trusted temporary files generated by that software. Adding safe folder exclusions tells Defender to skip those specific directories during real-time monitoring.
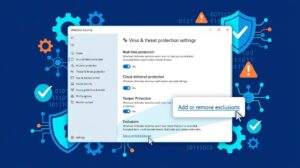
Security Note: Many outdated online guides suggest adding MsMpEng.exe itself to the exclusion list. Avoid excluding the entire Defender folder, as doing so creates a blind spot in your system protection. Instead, exclude only verified high-I/O folders (such as your Steam library folder, Docker volumes, or local build directories):
- Press the Windows Key, type Windows Security, and press Enter.
- Click on Virus & threat protection in the main dashboard.
- Under the Virus & threat protection settings header, click Manage settings.
- Scroll down to the bottom of the page and click Add or remove exclusions under the Exclusions section.
- Click Yes at the User Account Control prompt.
- Click the Add an exclusion button, select Folder, and choose the specific game installation library or development build directory that triggers high disk and CPU activity.
Fix 4: Flush and Rebuild Corrupted Defender Signature Definitions
Sometimes MsMpEng.exe gets stuck at 40%+ CPU usage even when your PC is sitting completely idle on the desktop with zero applications open. This behavior typically points to a corrupted local signature database (mpasbase.vdm) or a hung update queue that forces the service to loop endlessly.
You can purge the corrupted cache and force Microsoft Defender to pull a clean signature package using the built-in command-line utility (MpCmdRun.exe):
- Press the Windows Key, type cmd, right-click Command Prompt, and select Run as administrator.
- Clear the existing cached definitions by entering the following command and pressing Enter:
"%ProgramFiles%\Windows Defender\MpCmdRun.exe" -RemoveDefinitions -All - Wait about 15 to 30 seconds for the command to confirm that previous definitions have been rolled back.
- Immediately request a fresh, uncorrupted signature download from Microsoft’s servers by running:
"%ProgramFiles%\Windows Defender\MpCmdRun.exe" -SignatureUpdate - Once the console reports Signature update finished. No updates needed (or completes the download), restart your PC and monitor Task Manager.
Fix 5: Throttle CPU Allocation via Local Group Policy Editor
If you run Windows 10 Pro or Windows 11 Pro, Enterprise, or Education, you can enforce strict resource rules for Microsoft Defender across all system users through the Local Group Policy Editor (gpedit.msc).
- Press Windows Key + R, type gpedit.msc, and press Enter to open the Local Group Policy Editor.
- In the left sidebar, navigate to the following path:Computer Configuration > Administrative Templates > Windows Components > Microsoft Defender Antivirus > Scan
- Look in the right-hand pane and double-click the policy named Specify the maximum percentage of CPU utilization during a scan.
- Select the Enabled radio button at the top-left.
- In the Options box below, change the default value from 50 to 20 (or 25), then click Apply and OK.
- In the same Scan folder, double-click Configure low CPU priority for scheduled scans, set it to Enabled, and click OK. This drops the scheduled scan thread priority from level 9 down to level 8.
- Also in the Scan folder, double-click Scan archive files, and set it to Disabled if you frequently work with massive multi-gigabyte
.zipor.7zarchives (Defender will still scan any files the moment you extract them).
Fix 6: Run a Manual Full Scan and Repair System Files (SFC)
Ironically, one reason Antimalware Service Executable never stops running is that its quick background scan keeps getting interrupted before reaching 100%, or it encounters corrupted operating system files it cannot verify. Allowing a single manual scan to finish—after verifying system file integrity—often clears the pending maintenance flag permanently.
- Open an Administrator Command Prompt (Windows Key + X > Terminal (Admin) or Command Prompt (Admin)).
- Run the System File Checker to repair any damaged Windows files that might be hanging the scanner:
sfc /scannow - Wait for the verification to reach 100%.
- Next, open Windows Security > Virus & threat protection.
- Click Scan options right below the Quick scan button.
- Select Full scan (or Quick scan if you are short on time) and click Scan now.
- Let the manual scan run uninterrupted until completion. Once Windows logs a completed manual scan timestamp, the background catch-up service will stop aggressively polling your drive.
Fix 7: Diagnose Stuck File Handles Using Microsoft Defender Performance Analyzer
If you have tried every adjustment above and MsMpEng.exe still pegs a CPU core, a specific background utility or locked log file is constantly writing to your disk and triggering real-time inspection. Beginning with recent builds of Windows 10 and Windows 11, Microsoft includes a built-in diagnostic profiler called Performance Analyzer for Microsoft Defender Antivirus.
To see the exact file path or process forcing Defender to work overtime:
- Open PowerShell as Administrator.
- Start a live 60-second performance trace while the high CPU spike is actively happening by running:
New-MpPerformanceRecording -RecordTo C:\defender-trace.etl - Let your PC run normally for 60 seconds while the issue reproduces, then press Enter inside the PowerShell window to stop recording.
- Analyze the recorded trace and display the top 10 processes and file paths responsible for the scan overhead by running:
Get-MpPerformanceReport -Path C:\defender-trace.etl -TopScans 10 - Review the table output in PowerShell. It will print the exact
.exeprocess or directory path consuming the highest Duration (ms) and Count of scans, allowing you to either uninstall the misbehaving third-party software or add a targeted exclusion.
Frequently Asked Questions
1. Can I just disable Antimalware Service Executable permanently?
While it is technically possible to disable Microsoft Defender by first turning off Tamper Protection in Windows Security and then disabling Defender via Group Policy or installing a third-party antivirus (which automatically puts MsMpEng.exe into passive mode), leaving a Windows PC without any active real-time antivirus protection is strongly discouraged. Throttling its CPU limit and fixing its scan schedule resolves the lag without sacrificing security.
2. Why won’t Task Manager let me click “End Task” on Antimalware Service Executable?
Microsoft runs MsMpEng.exe as a Protected Process Light (PPL) service under the SYSTEM account. This architecture prevents malware or ransomware from terminating the antivirus engine prior to encrypting your files. Because of PPL protection, even an Administrator account cannot kill the process from Task Manager.
3. Could a virus be disguising itself as Antimalware Service Executable?
Legitimate Antimalware Service Executable (MsMpEng.exe) is always located inside C:\ProgramData\Microsoft\Windows Defender\Platform\<version>\ (or C:\Program Files\Windows Defender\). You can verify its authenticity by right-clicking the process in Task Manager and selecting Open file location. If MsMpEng.exe is running out of C:\Users\, AppData, or C:\Windows\Temp, it is a disguised trojan and you should immediately run a Microsoft Defender Offline scan from the Scan options menu.
4. Why does Antimalware Service Executable use so much RAM even when CPU usage is 0%?
Microsoft Defender caches virus signature definitions in system memory so it can inspect newly opened files in microseconds rather than reading signatures off your SSD every time. Using between 150 MB and 350 MB of RAM while idle is normal operating behavior on 64-bit Windows 10 and Windows 11 systems.
5. Does installing a third-party antivirus stop Antimalware Service Executable?
Yes. When you install a recognized third-party security suite (such as Bitdefender, Kaspersky, ESET, or Malwarebytes Premium), Windows Security Center automatically switches Microsoft Defender into passive mode, shutting down real-time scanning in MsMpEng.exe so the two engines do not conflict.
Sources & References
- Microsoft Learn: Troubleshoot Performance Issues Related to Microsoft Defender Antivirus (
Get-MpPerformanceReport& CPU Throttling). - Microsoft Support: Configure and Validate Exclusions Based on File Extension and Folder Location.
- Windows PowerShell Reference: Defender Module Cmdlets (
Set-MpPreferenceandScanAvgCPULoadFactor). - Microsoft Security Documentation: Command-Line Arguments for
MpCmdRun.exeDefinition Recovery.